Using the SmartBusinessEntityLookup Control
- Marko Rüterbories
- Janine Zwanzig
- Mike Fechner
The SmartBusinessEntityLookup Control can be used to support the end user when entering data that has foreign key fields. It provides functionality to search for information on the backend (database) and provides a separate, standarized Form with filtering and sorting possibilities. The population of other related fields like e.g. when looking up the SalesRep short tag “BBB” retrieve and display the full name “Bubba B. Brown” is also supported.
Setting up a SmartBusinessEntityLookup on a Viewer
It is a common requirement when entering data in a SmartViewerControl to select a value from a large list of options (e. g. the SalesRep, Item, Customer). Compared to a combo box which is meant to be used for small option sets (typically not more than 15 entries) the Lookup control has additional capabilities and is suited for infinite lists of records. You can define multiple filters used to find the entry you are looking for and reuse the same Lookup wherever you need the same information.
The following section will show a step by step description on how to add and configure a SalesRep Lookup to a customer viewer control. The sample starts with having a Form (CustomerForm) and a Viewer (CustomerDetailViewerControl) ready to be used.
Add a SmartBusinessEntityLookup Control to a Viewer
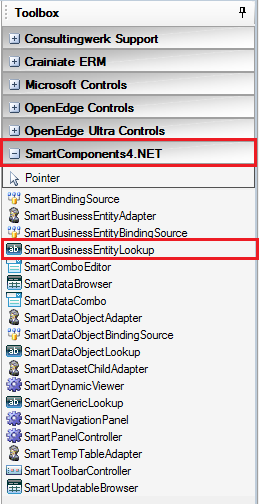
First thing to get a SmartBusinessEntityLookup added to the CustomerDetailViewerControl is to open the viewer control and add the control from the toolbox by double clicking it or select it from the toolbox and place it with the mouse wherever it should be.
The added SmartBusinessEntityLookup instance smartBusinessEntityLookup1 should replace a possibly already existing simple field for the SalesRep column on the viewer control. Shown below is the viewer with the SalesRep Lookup and the full name field of the SalesRep on the right side.

By selecting the Designer Verb AddLookupButton from either the Control instance’s context menu or the hyper links at the bottom of the property grid the Lookup button will be added to the Lookup (the button is shown at the right hand side within the Lookup).

Select the SalesRepBusinessEntity and the tables to be used by the Lookup
The next required step is to configure the BusinessEntity and Table that should be used by the Lookup for selecting records from. There are Designer Verbs to accomplish this by selecting “Select Business Entity” and “Select Tables” in this sequence. In this example I am using a SalesRepBusinessEntity including a table called eSalesRep.
Configure the SmartBusinessEntityLookup using the Designer
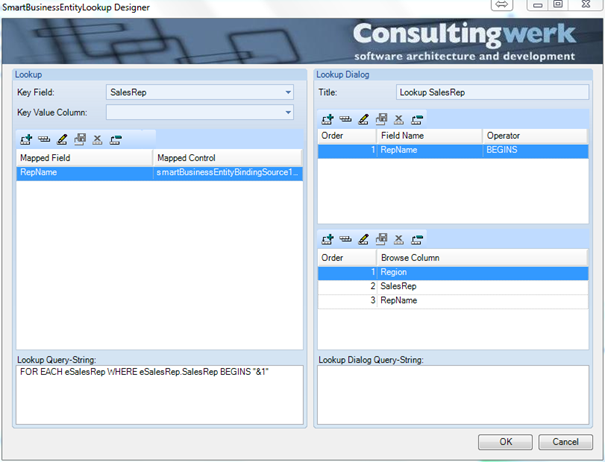
The SmartComponent Library provides the SmartBusinessEntityLookup Desginer designed to make the configuration of the Lookup as easy as possible. The Lookup Designer is accessible as well from a Designer Verb.

The tool is separated in two different areas. On the left side you can define all settings concerning the Lookup instance in the SmartViewerControl.
On the right side you define the options for the Lookup Dialog, particularly the Lookup Browser and the filter options. The Lookup Dialog will open, when the user presses the Lookup Button of the Lookup Control.
For the Lookup Control itself we are specifying the following settings on the left side:
Lookup | Values | Description |
Lookup Keys | ||
Key Field | SalesRep | The Key Field defines the column from the lookup table (eSalesRep in this sample) who’s value will be assigned to the Lookup Control itself (the Value property) when the user selects a record by entering a (partial) key in the Lookup Control itself or selects a record from the Lookup Dialog. |
Key Value Column | SalesRep | The Key Value Column defines the column from the lookup table (eSalesRep in this sample) whose value will be assigned to the LookupKeyValue property of the Lookup Control when the user selects a record by entering a (partial) key in the Lookup Control itself or selects a record from the Lookup Dialog. The LookupKeyValue property and thus the Key Value Column is required when using non-meaningful keys in your database design and/or Business Entity design. |
Mapping | Field/Control mapping allows the Lookup Control to assign values (Text property) to additional Controls in the Viewer. This is useful to return additional fields values (like the RepName) from the Lookup whenever the user selects a record. The mapped fields are maintained in a browser using two combo-box columns. The SmartBusinessEntityLookup allows developers to use any number of mapped fields/controls | |
Mapped Field | RepName | The Mapped Fields define the fields from the Lookup’s Business Entity that will be used to assign values to the mapped controls. |
Mapped Control | CustomerBindingSource _eCustomer_RepName | The Mapped Controls are the controls receiving the values from the Lookup Business Entity. |
Lookup Query String | FOR EACH SalesRep WHERE eSalesRep BEGINS "&1". | The Lookup Query String defines the query used to search for values in the Lookups Business Entity when the user either leaves the Lookup Control or does not type any keys for 0.75 seconds. The current value of the Lookup Control (potentially a partial key) is inserted to the query string at the location of the &1 token. The token should be put in quotes no matter of the data-type of the key field. |
And on the right side I use these settings:
Lookup Dialog | Values | Description |
Title | SalesRep Lookup | The title for the lookup dialog, like “Lookup SalesRep” |
Filter | Filters can be used by the user to search records in tables with a lot of records. The Lookup dialog supports any number of filters you need (including zero and one). To keep things simple for the user, a filter is always applied to a single field only. | |
Order | 1 | The order the filter options should appear in the Lookup Dialog. |
Fieldname | RepName | The field from the Lookup Business Entity to filter on. |
Operator | BEGINS | The operator to filter on. Valid operators are value ABL query operators. |
Browser |
|
|
Order | 1-3 | The order of the columns in the browser. |
Browse Column |
| Select the columns for the Lookup Browser in this order. |
Lookup-Dialog Query String | The query string to be used by the Lookup dialog. Leave empty for returning all values (filters specified as the source default query in the Data Access Object will apply always). |
The result should look like this:
To display the current value of the selected record we need to DataBind the field. In this sample it means to select the SalesRep field from the CustomerBindingSource.
When using a database design based on non meaningful foreign key values, you should bind to the LookupKeyValue property in addition to the Text property.

When running the application right now, we will see the following result:

Disable the field RepName in the CustomerDetailViewer Control
Because you select the SalesRep with your new Lookup Control when adding or updating customer records the field RepName does not need to be active. To disable it permanently do the following:
- Select the field RepName.
- Set Property Enabled to False.
After these steps we have a completely configured Lookup Control and are able to use it.